Thank you to Satya for coming back to Krishnamacharya's Yogasanaglu (Mysore 1941) for us and translating the final chapter that was added to the 3rd edition of the text in 1972, along with all the photos of Krishnamacharya practicing in his eighties.

The full text is being translated on this page above
http://grimmly2007.blogspot.jp/p/yogasanagalu-translation-project.html
and is now virtually complete, I will post the final section on pranayama next week.
Yogasanagalu was Krishnamacharya's second Mysore text following Yoga Makaranda ( Mysore 1934) and contains the table of Asana from which Pattabhi Jois, with some minor tweaks, taught his course at the Sanskrit College that formed the basis of today's Ashtanga Yoga 'style'.
This additional chapter added in 1972 will be more familiar to those who have been exposed to Ramaswami's teaching of 'Vinyasa Krama', however it appears that Krishnamacharya was teaching along these lines while in Mysore to private students and 'patients', perhaps in a side room while Pattabhi Jois, one of his assistants, would lead the boys of the palace through their group asana class. The slower breathing and Kumbhaka instruction we see here were all present in Krishnamacharya's first Mysore text Yoga makaranda ( available for free download above http://grimmly2007.blogspot.jp/p/free-downloads.html)
Note on Photos: In the original text of Yogasanagalu (1941) Krishnamacharya included instruction for twenty-one asana, these are the same instructions we find in the earlier text, Yoga Makaranda 1934 ( although that text contained twice as many asana). It seems likely that early editions of Yogasanagalu contained the same photos relating to the instruction as in Yoga Makaranda.
Krishnamacharya kept the instructions for the twenty-one Yoga Makaranda asana in the later editions of Yogasanagalu but not the photos. Instead, from the 3rd edition of Yogasanagalu onward, he included 120 photos of himself practicing, in his mid eighties,
In the additional chapter below, added in 1972, he gives instruction for seven of those asana in a short sequence. Although the photos are added at the end of the book I've embeded the seven relevant photos in the instructions just as Krishnamacharya did in Yoga Makaranda.
*
Yogasanagalu Additional Chapter 1972 (first part)
Yogasana Style
Dandasana is the first posture among the sitting asanas. Vyasa has spoken highly of this (posture) in the Yogasutrabhashya.
First part: Please see photograph No: 1 shown in this book.
 |
| #1 |
Procedure to practice: Place a soft blanket not less than 6 feet in length, sit down facing eastern direction with legs stretching straight forward and lift both hands above the head. Left and right forearms are aligned with the respective left and right ears and stretched upwards without bending the elbows. Hand fingers are interlocked tightly in such a manner that the palm is facing upwards and then the chin is lowered into the chest by bending the neck. The two feet are joined together with the heels touching the floor and the toes stretched upwards. Without bending the knees, keep the thigh muscles stretched tightly and hold the back erect. Softly close the eyelids and as explained before and take six deep inhalation and exhalations. After exhalation, pull in the region of abdomen in all the way into the navel. During inhalation, the chest is to be expanded. Breath should not be held for more than a second. In the yoga shastra, exhalation is known as Rechaka and inhalation is referred to as Puraka.
Kumbhaka is retention of breath. When we are practicing breathing like this, our stomach, neck, head and chest should not be moving up and down. Rechaka has to be longer than Puraka and also must be subtle. One Rechaka, one Puraka and one Kumbhaka make one Avrutta. Initially, only six Avrutta’s are enough and must be increased over time.
In this Asana, the body remains straight like a stick (Danda) and strengthens the spine, hands and legs and therefore is called Dandasana.
Benefits: Eliminates indigestion and rheumatic conditions
During each breath we should be practicing remembrance of God.
Dandasana part 2 (Photo # 2)
 |
| #2 |
In all respects this asana follows part 1 except that the palms of the two hands are now behind the back. In addition, both the palms are near the hips on the floor. The elbows must be straight and Kumbhaka must be performed after exhalation (Bahya kumbhaka). Please study the photo.
This posture is easy for obese as they have a hard time keeping the forearms up due to impediment from the lower half of their body.

Pashchimatasana (Photo #4)
 |
| #4 |
Although this posture has been practiced by yogis from ancient times, Swathma Rama yogi, the author of Hathayoga pradipika has praised this posture.
Practice: Please study the photo and practice
From Dandasana, take a deep Rechaka, pull in the stomach, keep the hand fingers interlocked, slowly bend forward, wrapping fingers around the legs with the palms facing on the outside. Rest the forehead on the knee caps or slightly beyond, perform Rechaka and Puraka, and keep the knees stretched straight without bending. Starting with three Rechaka and Puraka on the first week, keep increasing by one every week for a maximum of twelve Avruttis. This state is called Paschimatanasana. After this come back up from the posture and take rest.
Benefits: Pranavayu has two states called purvavahini gati and paschimavahini gati. purvavahini gati is wheezing or difficulty in breathing such as ashtma. This results from indigestion. People’s health deteriorates resulting in enlargement of stomach. In paschimavahini gati, the movement is behind the muladhara chakra. Enlarged stomach is made smaller by increasing the digestive fire, destroying indigestion and extending rechaka without wheezing. Isn’t this enough? One should not practice this on a full stomach. This posture is forbidden for pregnant women.
Purvattanasana (photo# 5)
 |
| #5 |
This is also called as the rejoinder to pachimattanasana.
When pain is experienced due to a particular type of body situation, space between bones, movement of pulse nodules and discrepancy in musculature, practicing these counter poses will alleviate such pains. This will help set the junctions, nodules and muscles into their original spaces. That means it will realign the body into original state. This secret was not known for many years. The reason? Not receiving advice from a Guru.
After experiencing this type of pain, people are deterred from practicing Yoga. They have been hesitating and becoming more reluctant to take up yoga practice. Even though they may be breaking limbs and bleeding from sports injuries, they don’t hesitate. In spite of spending lots of money on sports, they will continue to play, limp and make merry.
This Kali influence is said to be the main reason for disappearance of ancient Indian Arts and Sciences. In this way, every yoga posture has a counter pose. If we learn this practice from a Guru and yoga practitioners promote and teach others, it does not cause any harm to people. The yogic sciences will not disappear.
Procedure: Please see photo # 5. From Paschimattanasana position, inhale and lift both hands straight up and while exhaling deeply take the shoulders slowly behind the back and place the palm of the hands on the floor about 1 foot distance from the hips with the fingers facing forward. Similar to the second step in dandasana, push the chest forward and do a deep puraka kumbhaka. Pressing the heels and the palms tightly against the ground, lift the entire body in a straight line and drop the neck backwards. Close the eyes and keep still for at least 5 seconds. This is Purvottanasana position. After this, bend the neck to bring the chin to the chest, exhale and place the body down. In this way, practice three times in the first week and gradually increase to six repetitions.
Benefits: Eliminates pain at the back of the body. Eradicates fragility in the forearms and neck.
This posture is reciprocal to paschimattanasana since in paschimottanasana the entire body movement and position consists of bending forward in exhalation (rechaka) mode with the head bent forward.
Purvottanasana is the riposte with the body movement and position in contrast is not bent but straight, upward facing with hands behind in the mode of inhalation (puraka).
Chatushtada peeta (Photos # 6, #7 and #8)
After stepping down from Purvasana, sit in Dandasana pose and without changing the position of hands bend the two legs and join the heels and knees in front of the hips. Keeping the back straight, bring the chin to the chest and perform rechaka. (see photo # 6).
Pull the abdomen in towards the navel while doing puraka for five seconds and expand the chest area outwards while keeping the heels pressed to the floor. Lift the midsection and hips upwards and tilt the head backwards. Now the midsection of the body should look like a plank by lifting as much as possible #7. Remain still and do not change the positions of hands and legs. This posture is called chatushtada peeta. This will be hard for a couple of weeks. Afterwards becomes easier. Must be practiced slowly and patiently.
 |
| #6 |
 |
| #7 |
Benefits: All types of indigestion are removed. Must be practiced twice during the first week. After that three times. After five seconds of lifting the midsection come down while slowly performing rechaka and rest. Contra indicated after five months of pregnancy.
In yoga shastra, our body is divided into three parts: urdhva (upper) part, madhya (middle) part and adho (lower) part. Above the neck is urdhva, neck to reproductive organs is madhya and from there to the sole is adho. One can practice chatushtada peeta as tripada peeta by placing one foot in padmasana. Thighs will get stronger in this pose. Please see photo # 8 and practice.
 |
| #8 |
Navasana (Please see photo # 9 and practice)
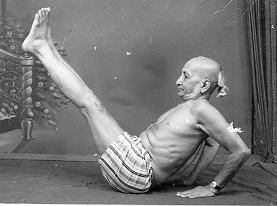 |
| #9 |
Come down from chatushta peeta and without changing the position of legs perform two rechaka and purakas and as illustrated in the picture without bending the knees lift the legs up while lowering the neck a little bit. Staying in this position without movement, perform rechaka and puraka for as long as possible.
Benefits: Slims down the waist and creates appetite
Ardha baddha padma paschimatanasana, part 1, (photo # 10, #11)
Procedure for practice: As in pachimatanasana, stretch the left leg forward and bend the right foot and place it on the left thigh with the bottom of the foot facing up. As shown in the photo, from the back, take the right hand and grab the right foot big toe with the palm facing down. Extend the left hand with a forward bend and tightly hold the left foot big toe with index and middle fingers or if possible with all fingers. Keeping the back straight, pressing the chin to the chest, perform not less than three rechaka and purakas (see Photo #10).
While doing the 4th rechaka, fully extend the mid portion of the body and while lowering the head place the forehead on the knee (see photo #11). Now repeat the corresponding posture with the right leg extending forward. In this posture, one foot is like paschimatanasana and one foot is in baddha padmasana. Therefore, it is called ardha baddha padma paschimatanasana.
 |
| #10 |
While doing the 4th rechaka, fully extend the mid portion of the body and while lowering the head place the forehead on the knee (see photo #11). Now repeat the corresponding posture with the right leg extending forward. In this posture, one foot is like paschimatanasana and one foot is in baddha padmasana. Therefore, it is called ardha baddha padma paschimatanasana.
 |
| #11 |
When people with obese or lean body types start practicing yoga and pranayama vigorously, it is natural to experience some pain in bone joints and musculature. Because there is no type of exercise that will not induce such pain, we should not hesitate. If we can tolerate for a few days and continue to practice, it will be most beneficial.
Without practice, no one can achieve the ideal posture shown in the photos. By gradually increasing the practice daily, we can achieve the perfect posture. We should not use force.
Ardha baddha paschimatanasana part 2 (photo #14)
 |
| #14 |
While sitting similar to part 1, if the left leg is stretched out, turn the left palm outwards and grab the left foot just beneath the big toe. Turn your neck towards the right shoulder and look at the back. Do not change the position of the right hand.
When the right leg is stretched out, turn the right palm outwards and grab the right foot underneath the big toe. Turn the neck towards the left shoulder and look at the back.
The benefits are so many that it is impossible to discuss them all. Many afflictions that have their roots in waist, neck, stomach, arms and vision will be removed.
This posture must not be done immediately after eating or by women who are more than 5 month pregnant.
Matsyendrasana
This is divided into uttama, madhyama and adhama (full, half and quarter) stages.
If one can practice, adhama matsyendrasana adequately, they are ready for madhyama and once proficient they will be eligible for full matsyendrasana. Otherwise, they will be the target of so many afflictions.
It is unfortunate to do yoga practice without knowing this secret. Those with obese body type must become proficient in the two parts of ardha baddha paschimatanasana before jumping into matsyendrasana. Some people have obesity from childhood. Now a days, 70 percent of both male and female children have obese body type. This is a danger to a healthy life and acts as seed for the development of asthmatic condition. These kids must be coerced into learning yogabhyasa.
Adhama matsyendrasana (photo # 15)
 |
| #15 |
I trust that those who are interested in practicing will learn from a qualified yoga teacher.
*
Appendix

Note: I will be posting the final part of this chapter, completing the translation of Yogasanagalu next week.