Friday, 30 December 2011

Day 90 : LOTUS : Urdhva padmasana (lifted up lotus pose) Subroutine from Vinyasa Krama Lotus sequence

VIDEO LINK
HINTS\TIPS\SUGGESTIONS

To get up into Shoulder stand while in Lotus, bring you arms to your side, exhale fully and press your arms down into the mat, hold and roll the lotus up to your chest, aim your knees at a 45 degree angle up over your head and stretch/push your knees up into shoulder stand while shifting your hands to your hips and then your back either side of your spine with the fingers pointing up and the elbows not too far apart.

Alternatively, Start from regular shoulder stand, spread the legs apart, drop the left leg back a little, bring the right foot to the left thigh by rotating at the hip then bring the left foot to the right thigh again through the rotation of the hip.

Engage mula and uddiyana bandha at the end of the exhalation sucking in the belly to create more space to lower your lotus down to your chest.

Remember in Vinyasa Krama you can work towards this, lowering a little way on the first exhalation, take it back up on the inhalation, lower a little further on each exhalation.

When lowering your need to make sure your hips are high and over your shoulders or you will tend to roll back down to the mat.

Pindasana (pic 4) The fold needs to be deep, use the bad has, sucking your belly back and up into your ribcage to create space. your inhalations will be short but try to keep your exhalations long.

Ultimately your want to wrap your arms around your lotus and bind at the wrist, this requires a deep lotus with the feet high up in the groin and heels digging into the belly.

If your lotus is not as tight then bind at the fingers or just hold the thighs.

Twists
From udrdhava padmasana (lotus shoulderstand) Stretch up through the pelvis lengthening the body as much as possible, twist on the exhalation and lower/fold your  knee to the outside of your forehead.

Again, work a little lower on each exhalation

Remember to keep the hips high and over the shoulders to prevent rolling back.

Counterpose (pic 8) There are two hand positions, the one in the picture with the palms supporting the sacrum and the another where the thumbs point toward but remain outside of the spine, resting lower down on the back of the hips with the fingers coming around the hip bone. I tend to prefer the later.

This is a back stretch so tuck the tailbone under and to counter the weight of the legs by pushing the chest out and up, engage jalandhara bandha (chin lock) firmly. 

The posture is entered on the inhalation by bending from the waist and arching the back.

Stay in the position for three breaths, perhaps going a little deeper into the pose each time or go back and forth to akunchita urdhva padmasana (pic 3) and the counter pose on the breath if holding is too challenging.

Simhasana Subroutine VIDEO LINK. From Akunchita urdhave padmasana, stretch out the arms above your head, roll your lotus slowly down to the mat, keep the momentum to bring your arms up and over passing through regular lotus as you put your hands to the floor and come up on to your knees. Lower your body flat to the floor stretch your arms out in front of you, palms together as if in prayer.

Place the palms on the mat beside you close to your chest. Tuck the tailbone (this is a back stretch) anchor the knees, try to bring the hips as close to the mat as possible , arch the back stretching out through the waist. Stretch out through the full length of your body, pushing out your chest take the head back. The is a Bhujangasana variation and can be worked on in the Bow sequence subroutines.

Another Lion face variation
Lions face. Inhale stretching back the head and as you exhale make a long  Haaa sound while stretching your tongue out and down and widening the eyes. Focus your attention on the mid brow. 

You may like to repeat this three times, closing the mouth on the inhalation and taking the head back before repeating the lions face on the exhalation.
Day 89 : LOTUS : Badha Padmasana (bound lotus) from Vinyasa Krama Lotus sequence

VIDEO LINK
HINTS/TIPS/SUGGESTIONS

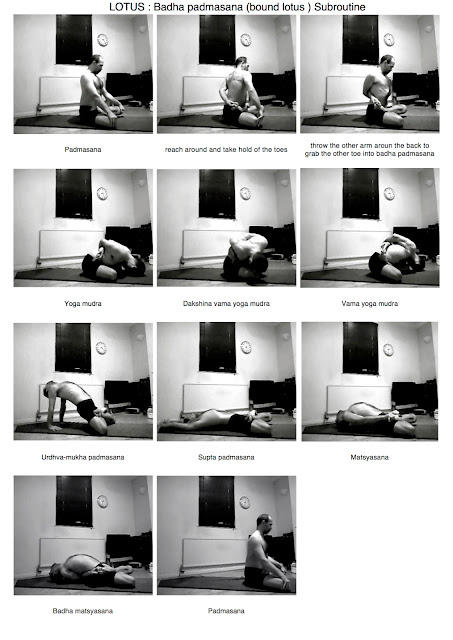
There are some easier versions of baddha padmasana (pic 3)

1. Reach around the back with the left hand and place the back of the hand on the waist, just above the hip bone. Reach around with the right arm and place the back of the hand against the waist just above the left hip.

2. When the above feels comfortable, turn the left hand (the one resting above the right hip) over, use the little finger to draw your hand onto the hip bone.

3. When that too feels comfortable, try to do the same with the other hand, turning it over and using the little finger to leaver the hand down onto the hip bone.

This may be your bind for a little while, play with it, stretching  up, arching back a little, twisting a little to the left a little to the right, explore how to get a better grip on the hip bone.

Try to lever the right elbow a little further over the left by using your right hand as a fulcrum.

4. When you feel ready to move on reach far around with the left hand and take hold of the big toe now use the hip bind above for the other hand, reaching around with the other hand but just pressing the back of the hand against the waist above the hip. Switch hands to become comfortable with both sides.

5. It's possible to use a belt, strap or scarf thrown over the feet  to work your hands down to your toes or perhaps the second hand.

6. Another approach is to reach around with the left hand and take hold of the left toe then instead over throwing the right arm around the back and over the left arm, try threading your right arm between your left elbow and back. Use the left arm to work your right over your back and down toward the left hip and finally right toe.

7. To get the full bind , make a tight lotus, you feet high up in your groin, heels pressing into your belly.

Lift up out of the pelvis and twist around to the left as far as possible, keep lifting and twisting. Use your hand to press into the hip and lever you arm a little further around to enable you to take hold of your toe.

Now twist to the right leading with the shoulder, bring the back of the hand to the waist and work it down over the hip lifting and twisting all the way until your able to hold your other toe.

Straighten up the shoulders, settle and engage bandhas and take long slow breaths.

Forward bending, to the front and sides.

here we need to engage mula and uddiyana bandha, sucking in the belly to create space, this is especially importat in the forward bends to the sides where we want to stretch out over the knee.

Before folding forwards, arch the back slightly, stretch up tall out of the pelvis, push back the buttocks and stretch out over your lotus and when to the slides, your knees.

Urdha mukha padmasana (pic 7) is a back stretch, a counter pose, tuck the tailbone under and push the chest out and up.

Baddha matsyasnana (pic 10 )is a more challenging version of seated baddha padmasana, try the above variations to work towards it, ultimately you will need to arch your back and twist fist to the left and then the right. 

You might find this version of the baddha padmasana bind easier as you have the floor to help you work your arm around, your also able to tilt the lotus towards.

Wednesday, 28 December 2011

Day 88 : LOTUS : Padmasana (lotus) from Vinyasa Krama Lotus sequence

VIDEO LINK
Padmasana (lotus) can be a challenging posture and there are many places to work towards it in Vinyasa Krama.

In Asymmetric Sequence: Padmasana doesn't appear as such but there are several hip opening postures, janusirsasana leading to mahamudra in particular, that prepare you for ardha baddha padmasana (half lotus).

In Lotus sequence : The lotus sequence picks up where Asymmetric leaves off with more vinyasas in half lotus before moving on to full lotus.

In Seated sequence : Padmasana (lotus) follows the deep hip opening subroutines of upavishta konasana and badha konasana.

In Supine sequence : More half lotus variations, this time in dwipadapitam (table pose). In shoulder stand we have the half lotus vinyasas of Day 68 but also the extreme hip openers of the previous (Day 69 ) Urdhva Konasana subroutine.

In Inverted Sequnece : As with Supine and Seated the lotus vinyasas in headstand follow, konasana and badha konasana subroutine.

In all of the above sequences we can see that padmasana (lotus) follows hip opening postures, this is because padmasana (lotus) involves a rotation of the hip joint rather than a twisting of the knees.

HINTS/TIPS/SUGGESTIONS

Getting in to full Lotus

NB: THE most important thing to remember is to protect your knees, that it's the hip joints that do all the work, the knees only bend one way it's the rotation of the ball and socket hip joint that makes padmasana possible

Right leg
Bend the right knee and bring it up towards the chest. Reach with the right hand down inside the thigh and take hold of the right ankle.

Allow the right knee to drop out to the side through the rotation of the hip joint. Focus on that hip action, of the ball and socket joint, the femur head rotating in the hip socket, encourage it.

There's a tensing of the right buttock a lifting almost and a stretching of the thigh as you encourage the rotation in the hip joint that will bring the knee down towards the mat and the ankle to come up. This action should only happen at the hips joint your NOT pulling up the ankle and your NOT forcing the knee down.

If this isn't happening it might be best to work on more hip opening postures, mahamudra in Asymmetric, badha konasana in Seated.

Lift up through the torso, support the right foot with the left and right palms and guide NOT pull the foot to the left thigh.

Lift up again and bend forward slightly, roll onto the front of the sit bones and guide the right foot a little further up the left thigh into the groin.

Again lift and roll further onto the sit bones allowing the right knee to rest on the mat.

Left leg
Bend the left knee and again focusing on the hip joint allowing the left knee to drop out to the side.

Rock your body forward and draw the right knee out to the side through the thigh muscles. Lock the knee by pressing the calf muscles against the thigh.

Reach over the left foot and support the left ankle with the left palm, cupping under the foot with the right palm, encourage the hip joint to rotate further and allow the knee to drop further out and down. Again, your not pulling on the foot but rather supporting it to allow the hip joint to do it's work.

Lift up through the torso, rock further forward on the sit bones and stretch out through the left thigh to allow the foot to come up over the right leg. 

Using the strength of the thighs bring the knees a little towards each other this will bring the right foot finally up onto the right thigh closer to the groin.

Shuffle around on your sit bones if necessary, encouraging more rotation of the hip joints to tighten the lotus, this is preferable to wrenching, tugging, pulling the feet.

Ultimately, for many of the lotus vinyasas you will require a nice tight lotus where the heels are digging slightly into the belly, the soles of the feet pointing up and the knees closer together. In fact, the heels can be considered to be massaging the inner organs in some of the vinyasas by pressing deep into the belly

To release
Sit up straight lifting up through the torso, focus on the left hip joint and encourage it to rotate by engaging the thigh muscles which will press the left knee into the mat this will allow you to very gently encourage the left foot off of the right thigh.

As you allow the knees to draw apart the lotus will unfold, again allow the right hip joint to do it's work bringing the right knee down into the mat and allowing the right foot to glide off the left thigh.

Padmasana subroutine
Ramaswami recommends coming into half lotus, taking a breath or two, continuing into full lotus, staying for a three breaths and then releasing the lotus before repeating six times.

You may wish to enter and exit your lotus for each of the vinyasa in this subroutine. Over time you may feel comfortable staying for a couple of the vinyasas and eventually the whole subroutine even sequence.

Lotus postures are excellent for working on the bandhas, the perineum is grounded allowing for greater focus on mula bandha, the lotus a stable base for deep uddiyana and jalandhara bandhas ( see practice guidelines Day 1 for more on bandhas).

Bhadrasana The hand position can be low on the thigh fingers tucked under the feet (pic 5) or closer to the knee (pic 6). If the knee be careful not to press the knees down, especially if the lotus position is still new to you.

Laghu yoga mudra (pic 8) is a deep forward bend, draw the buttocks back, come onto the front of the sit bones, engage mula and uddiyana bandha, sucking in the belly in to create more space for the body to fold forwards over your lotus. The same goes for the side vinyasas of yoga mudra (pic 11 & 12), be careful not to allow the opposite knee from the side your folding in to to raise, encourage it to stay down by grounding the sit bones.

Utpluthi (Pic 9) is all about hand placement. place the hands too far forward and the weight of the hip bones will keep your grounded, too far back and the weight of the knees will stop you from achieving lift. So place the hands just forward of mid thigh as close to your thighs as possible.

Bring your shoulders over your hands, bring your shoulders down, engage the shoulder girdle and after exhaling hold the breath out and push down into the mat through your hands and lift

Mula bandha should be engaged but engage it more strongly, tuck the tailbone under, the lower half of your body should feel tight and compact, draw your pelvis up into your torso and hold.

Keep the bandhas engaged and the tailbone tucked while your breath.

In this version of utpluthi you bend the body over the lotus, in a later version in the lotus sequence the body is more erect.

Day 87 : LOTUS : Ardha badha-padmasana (half lotus) from Vinyasa Krama Lotus sequence

VIDEO LINK
This is almost the same subroutine as Day 26, Adha padmasana, found in the Asymmetric sequence.

This subroutine along with the half lotus subroutines found in the other sequences can be considered as preparation for full lotus

from On One Leg Sequence Day 17 Vrikmasana
from Asymmetric Sequence Day 26 Ardha padmasana
from Asymmetric Sequence Day 32 Ardha padma marichiyasana
from Supine Sequence Day 60 Dwipadapitam
from Supine Sequence Day 68 Supta ardha badha halasana

The hip opening Mahamudra subroutine from Asymmetric Day 27 is also good preparation for the half lotus as well as the Badha konasana Subroutine leading up to padmasana  from Day 42

HINTS/TIPS/SUGGESTIONS

Half lotus
See Day 17 Vrikmasana for some notes on standing half lotus.

To get into half lotus : Bend the knee bringing it towards the chest, allow the knee to drop out to the side, key here is the natural rotation in the hip joint. Bring the foot close to the opposite thigh, hold your foot in one hand and the knee in the other and GENTLY encourage the roration of the ball and socket hip joint, bring the knee forward parallel with the floor towards the opposite knee and the foot further up the thigh and ideally, eventually, towards the groin.

CAUTION
You don't want to force this action, if you feel strain on your knee it may be better to practice tomorrows subroutine built around mama mudra with the foot against the thigh rather than on top instead. Practicing the maha mudra subroutine will bring half, and eventually, full lotus closer.

As we have found in all forward bending asana, stretch out of the hips as we practiced in the standing On your feet sequences, the same goes for the twisting postures.

CAUTION.
In picture 4 (the raised hip), Vasishtasana or Kashyapasana we must be careful of the knee. Work from the top down, pushing down into the mat and lifting your shoulders then lifting the hip which will allow the leg to straighten, lower in reverse, DON'T push off the mat from the foot, knee or hip first as this will put too much strain on the knee which is vulnerable here.


Monday, 26 December 2011

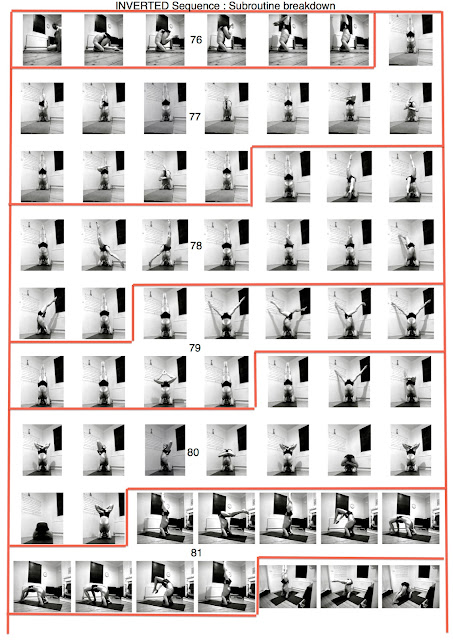
DAY 86 : Inverted: Subroutine Breakdown

VIDEO LINK
Day 76 : INVERTED : Sirsasana (headstand) lead in from Vinyasa Krama Inverted sequence

'...when sirsasana is mastered, the breath rate, which is normally about fifteen to twenty breaths per minute, automatically comes down', 

Work towards two breaths a minute over time.

'Sirsasana should always be practiced in the morning, as is laid down by the authorities on yoga.' 

'And, as a counterpose, it should be followed by an equal length of time in the practice of sarvangasana (shoulder stand)'. 

'The procedure is thus to do  sirsasanam for twenty-four breaths, followed by a two-minute rest in savasana. Then one should do sarvangasana for the equal number of twenty four breaths, followed by a sitting posture each as padmasana for a few breaths, until one feels normal and relaxed'.  

from Srivatsa Ramaswami Yoga for the Three Stages of Life p142

Practicing Inverted Subroutines

Towards the end of my morning asana practice I spend few minutes in the sarvangasana preparatory postures, anapanasana, urdhva prasarita pada hastasana and dwipadapitam.

I then spend at least five minutes in sarvangasana, the first three minutes with the legs relaxed.

Then I practice for headstands for ten to twenty minutes (ten minutes minimum).

For the first five minutes I don't practice any vinyasas but try to slow my breathing towards two breaths a minute and work on engaging bandhas.

The rest of the time in headstands I spend on Vinyasas, one or more of the inverted subroutines.

Coming down from headstand I'll stay for a few moments with my forehead on the mat, when sitting up I'll bring my head up last.

After a couple of minutes in savasana I practice another five minutes of Sarvangasana (shoulder stand), this time practising vinyasas, one or more shoulder stand subroutines

Finally I'll spend a period of time in Vajrasana, padmasana or mahamudra before moving on to my pranayama practice.

Sunday, 25 December 2011

Day 85 : INVERTED : Handstand subroutine from Vinyasa Krama Inverted sequence

VIDEO LINK
This handstands subroutine takes a considerable amount of strength and stamina as well as good balance, it is something we can work towards however. Pincha mayurasana, the forearm stand from Day 83 is excellent preparation, individual vinyasas from Day 83's Niralumba Sirsasana subroutine might be included in our regular daily practice to build strength.

In this subroutine the full handstand is achieved by pushing up from kapliasana, the tripod headstand, this is particularly challenging and may take regular practice. 

Another entry to handstand is from Downward dog, jumping with the feet together bringing the hips over the shoulders, the legs straight out in an inverted dandasana then unbending the waist to bring the legs vertical. We may prefer to practice this at the wall.

Another option, is again from downward dog to kick first one leg and then the other vertical.

The trick is the bring the shoulders over the hands as we kick or jump up bringing the hips over the shoulders.

HINTS/TIPS/SUGGESTIONS

Handstand from tripod
Lift the head from the mat and bring it through the arms taking the legs over the head, exhale hold and push down ion the mat engaging and stretching up through your legs to press up to handstand.

In working towards this entry we might kick up to the wall in handstand and then, with the feet against the wall, bend the elbows slightly to allow the head to lower, with control, towards the mat. Lower just a little at first and then push back up to handstand. Lower a little further each day or each week.

Vrishikasana (pic 4)
A backbend, bring the head and chest through the arms and the feet as far over the head as possible. 

Engage mula and uddiyana bandha as if your taking a firm grip on the tailbone which you then tuck in as much as possible.

Push the hips forward as much as possible, stretch out through the full length of the spine, bring the chest through even further, stretch out through the hips, legs feet.

Allow the hips to drop arching the back, allow the knees to bend bringing the feet towards your head.

To return to regular handstand, unbend at the waist pushing up through the legs.

Bhuja peedasana (pic. 6)

Returning to Kapilasana, the tripod headstand, bend the knees, engage mula and uddiyana bandha drawing in the belly to allow your knees to come as high up and close to the chest as possible.

Bend at the waist and bring the knees to the outside of the armpits. Squeeze the knees as if trying to bring them together although your torso, of course, is in the way.

Allow the hips to drop at the same time bringing your head off of the mat.

Drop the shoulder blades down the back, Engage the shoulder girdle. Press down into the mat, bring the shoulders ever further forward to counter the weight of your hips. Straighten the arms and try to bring the feet as close to your bottom as possible.

To exit, bend your elbows slowly and lower your head gently to the mat, take the knees up and then unbend the knees back into kapilasana.

Bhuja peedasana variation (pic. 7)

Precede as above for buja peedasana but being sure that the knees are as far up on the outside of the armpits as possible, unbend the knees and stretch them around in front of your body and bind at the ankle. Drop the hips and bring the feet up higher and hold for three to six breaths.

To return.
Unbind the ankles, raise the hips high, bend the knees and bring your feet back behind you and up towards your bottom. Return to kapilasana as for bhjua peedasana above.

Urdhava Kukkutasana (pic 8)

This vinyasa demands a nice tight lotus.

Open your legs or drop back the left leg and bending the right knee rotate the hip joint to allow the left foot to come onto the left thigh high up near the groin. Drop back the right knee, rotate the femur head in the left hip joint to allow the left foot to come up onto the right thigh.

Try to work the right foot high up the thigh to make as tight a lotus as possible.

Engage mula and uddiyana bandha, draw in the belly to create space for the forward bend. Bring the knees as far up into the armpits as possible.

Visualise pressing your knees through your armpits so the protrude out through your arms.

Allow the hips to drop at the same time pressing down through the hands. Move the shoulders forward beyond your hands to counter the weight of the hips. The shoulders blades are dropped down the back the shoulder griddle engaged as the arms straighten and you settle for three to six breaths.

To return
Bend the elbows slightly at first and lower your head slowly and with control to the mat by bringing the hips up.
Once the head is on the floor take the hips back and unfold at the waist raising your lotus, unbind and stretch out through the legs.

Ashtavakrasana
Bend the knees towards the chest as if in Bheeja peedasana but twisting bring the right knee (with the let above it) across the chest towards the left armpit, take the knee beyond the arm and resting the knees abut the arm stretch-out the legs on the exhalation while raising the head.

Stretch out through the legs at a right angle to your bay while  raising your chest and head, stretch out through the head and chest as much as possible.

The return is challenging. Lower the head back to the mat as you bend your knees and bring your feet back as close to your bottom as possible while lifting the knees off the arm and untwisting. Take the hips high to bring the knees back to the chest and return to kapilasana.

Day 84 : INVERTED : Arm variations in Niralumba sirsasana ( headstand without support) subroutine from Vinyasa Krama Inverted sequence

VIDEO LINK
In this subroutine we have four headstand arm variations, the regular sirsasana in Picture 1, arms outstretched (pic 2), arms folded in front of our face (pic 3) and the arms outstretched in front (pic4).


In the previous subroutine we also had the forearm, pincha mayurasana, version.


In the next subroutine there is yet another hand variation where the head and arms form a tripod.


HINTS/TIPS/SUGGESTIONS

Try all six headstand hand/arm variations individually and decide which two you find most comfortable, more stable.

Try switching between the two, when that is comfortable try switching back and forth between these two most comfortable variations.

Practice switching back and forth in your regular headstand practice.

You may find that although the regular headstand and, perhaps, the tripod variations are the most stable but that this is not necessarily the easiest transition.

Try switching from the regular headstand into each of the hand/arm variations to find which transition is the most comfortable.

Once found, practice this transition regularly becoming more comfortable with the shift in weight as you move first one arm and then the next. The control we develop here can then be applied to the more challenging transitions.

You might find that entering the different headstand variations from vajrasana or downward dog easier than switching hand positions while up in headstand, if so practice each of the headstand variations separately spending time in each until they become stable.

I tended to find the transition from regular headstand to the arms folded in front of the face the most awkward and the entry to the forearm headstand from downward dog was the most challenging, you might be different.

In all the transitions we want to engage the torso, the chest, stretching the front back and sides. Stretch up through the pelvis the legs, feet toes as if reaching up towards the ceiling, we want to create a feeling of lift, of lightness.

Arms outstretched
Ideally we want to have our arms and head in a straight line. the further forward our hands the more stable the position.

Shift your weight slightly to one side pressing down firmly on the right little finger, forearm and elbow, while inhaling stretch your left arm out to the side but slightly forward.

Shift your weight to the left side, the head and left hand, press down through the mat and, on the next inhalation, stretch out the other hand to the side but again a little in front.

Stay for a three breaths then reverse the process bringing first one then the other hand back to support the head.

As you practice this version, work to bring your hands further back until you are comfortable with your hands inline with your head.

The final version is to move both hands at the same time, again begin by moving the hands, on the inhalation, to the sides but a little in front, working, over time to the hands in line with the head ideal.

from downward dog
Again begin practicing with the outstretched arms slightly out of line, forward of your head as it's a more stable position.

The trick is to walk in so that your hips are as far over your shoulders as possible, this will take the most strain away from the neck.

Press firmly into the mat with the hands.

To lower bring the hips as far back as possible so that you can lower slowly and with control, bringing the knees to our chest first and then lowering the feet.

Arms folded
Shift the weight or at least line of balance to the left arm and then thread the right arm in frount of your face. Shift the weight, line of balance, to this arm and then bring the left to join it folding the arms. reverse the process, a subtle shift of weight/balance to one arm while you bring the left hand back to the starting position behind your head and then the other.

from downward dog
With the arms folder in front of your face we need to make even more of an effort to bring out hips over and even beyond our shoulders before bending the knees lifting our and bringing our knees to our chest. 

Lower in the same way as for arms outstretched but shifting the hips even further back over and beyond the shoulders, as far as possible.

Arms outstretched.
We may try this variation with the palms face down at first while we gain control and stability within the posture but ideally the palms will be facing up.

We might get into the position with the palms down and then turn the palms over into the full expression of the vinyasa.

As with all the headstand hand/arm versions above, shift the weight/line of balance slightly to one side as you shift the hand position, here outstretched in front of you. press down through the first palm or back of hand, shift the weight/line of balance slightly and bring the other hand to join it, reversing the process after three breaths.

from downward dog.
We might consider entering the arms outstretched position from tripod headstand, the hands placed on the  mat, palms down at a 45 degree angle to our head.

Walk our feet in to bring our hips over and even beyond our shoulders, bends the knees and bring them to our chest. Unbend the waist taking the fee behind us and then unbend the knee into sirsasana.

Shifting the weight/line of balance move first one hand further forward and then the other.

When we are comfortable entering via tripod try entering the arms outstretched in front variation with the palms down and then finally with the palms up.

Try lowering from this position, first with the palms down but latter with the palms up using the backs of the hands as support.

Lower in the same way as for arms outstretched,shifting the hips even back over and beyond the shoulders, as far as possible.

Saturday, 24 December 2011

Day 83 : INVERTED : Niralumba sirsasana ( headstand without support) subroutine from Vinyasa Krama Inverted sequence

VIDEO LINK

HINT/TIPS/SUGGESTIONS

Coming up to headstand with the forearms on the mat can be challenging, the trick is to walk the feet in, bringing the hips well over the shoulders.

Press down into the mat from the fingertips to the elbows.

In regular headstand where the fingers are interlocked you may find that you press your arms into the mat while attempting to draw your hands apart and yet squeezing your fingers together to prevent them parting, this pulling of the hands can help ground and anchor your arms as you lift up.

A similar effect can be had in the forearm version where you press down into the mat  but also try and slide your arms apart along the mat, because the pressing into the mat is stronger than the attempt to draw the arms apart the arms stay in place and yet the action anchors the arms and gives a secure foundation as you move through the more challenging vinyasas.

The lift
Notice the 45 degree angle of the arms in Picture 7. To lift, exhale and push down though the hands, forearms and elbows and draw your shoulders back to bring your arms to a 90 degree angle at the elbow, as your shoulders come back your head lifts off the mat.

Stretch out through the full length of your body, through the trunk, hips, legs feet even the toes.

Arch your back bringing your legs over and beyond your shoulders take the head and chest through the arms, to balance.

Forming your lotus.

With your head and legs forward of your shoulders allow one leg to drop back, your left and folding the right one, rotate the hip joint to allow your right leg to rest on the left thigh as high up near the groin as possible. bring the left leg forward and bending the knee bring the left foot on to the right thigh while pressing down through the forearms and pushing the head through the arms as much as possible.

Vrischikasana
We need to create a deep arch in the back, engage  mula and uddiyana bandha to support the tailbone which we want to tuck forward to create more space in the vertebrae. 

take the head through the arms as much as possible, take the legs further over and push the pelvis forward. Stretch through the length of the legs and allow the weight of the legs to drop them down towards the head.

To exit, push through the legs and unbend the waist on the inhalation.

In the Subroutine we should ideally stay in pinchamyurasana as asana sthiti as we move through the vinyasas. However, as we build strength we might practice each vinyasa separately coming back down to downward dog and even taking a mini savasana to allow the heart rate and breath to steady.


Friday, 23 December 2011

Day 82 : INVERTED : Inverted Mandala ( Parivrttasana ) Subroutine from Vinyasa Krama Inverted sequence

VIDEO LINK
HINTS/TIPS/SUGGESTIONS

The Inverted mandala (Parivrttasana) is a more challenging version of the Sarvangasana (shoulder stand) mandala from Day 73.

It includes viparita dandasana from Day 82 but because it doesn't involve the drop back into the posture sit can be practiced as a stand-alone subroutine.

Viparita Dandasana is quite is an intense backbend so some backbend preparation is advised as warm up, the back bend vinyasas from the tadasana subroutine, Day 1, is a suggestion as are some of the pelvic lifts from Supine as well as perhaps urdhava danurasana.

More intense than the backbend is the belly twist as you flip first one way and then the other as you walk around. Twist preparation might include Parsva-bhangis, from Day 2 and especially the belly twists from Supine, Jataraparivritti Subroutine day 64.

The flip
As you lower your feet to the mat, ground your head and elbows and walk around, clockwise, on the inhalation. When you can no longer keep your feet on the floor come up on to your toes.

Exhale, take one last large step with your left foot, hold the exhalation, bring your right hip up, take the right leg over the left, twist at the waist  and flip your leg all the way over so your right toes lands on the mat in front of your left foot.

The higher your able to keep your hip the more you'll be able to keep the head and elbows anchored on the mat.

Continue walking around, pause for a breath at viparita dandansana then carry on around clockwise as far as your able.

Again on the exhalation, take one last step with the right foot up on the toes, the hips high. Hold the exhalation bring the left hip over twisting at the waist as much as possible, step over with the left foot and give a last flip of the hips to bring your left foot all the way over the right landing on the toes.

Continue on round to the starting position and return to Sirsasana

Thursday, 22 December 2011

Day 81 : INVERTED : Viparita Dandasana (crooked staff ) subroutine from Vinyasa Krama Inverted sequence

VIDEO LINK
HINTS/TIPS/SUGGESTIONS

Fear is the biggest problem here, we're never quite sure how far our feet are away from the mat behind us.

Overcoming the fear.

Knowing our body will be comfortable in that position helps. Before dropping into Viparita dandasana from headstand, try it from the mat first. Push up into udhva dandasana then bring the hands to the head, cupping it as in headstand with your forearms and elbows on the mat. Finally walk the feet out into viparita dandasana proper.

From viparita dandasana, walk the feet back in and  hop up and down a few times. your not trying to come up but just to get a feeling for how you'll drop into the position.

Walk further so you have to go up onto your toes, hop up and down again this time on your toes again just to get a feeling for how you'll land on your toes.

Notice how as you walk in your chest comes forward, this will be key for dropping out of headstand but also for hopping back up again.

If you still lack confidence consider putting some large firm cushions at the end of the mat to drop on to.

You might start with several cushions and then take one away each time until your finally dropping directly onto the mat.


Lowering the legs into urdhava dandasana (pic.2)

As you lower your legs, push your hips backwards as far as possible

Keep the lower back flat, don't allow it to round

Stretch out through the legs

If you push your hips back far enough they should act partly as a counter weight to your legs allowing your legs to stay horizontal without too much effort.


The drop (pic. 4 & 5)

As you take the legs over you need to counteract the weight of the legs as much as possible giving you time to lower them, with control, as close to the mat as possible.

Push down into the mat with your elbows, this is your anchor

Drop your shoulder blades down your back

Inhaling push out your chest, bringing it towards your chin, imaging your pushing tour chest out and down towards the mat.

Allow your back to arch

Tuck your tailbone and engage the bandhas as fully as possible

While doing all of the above, lower the legs further and further behind you you.

Your knees will be bent, allow your feet to drop to the mat landing on your toes and then your heels.

Once landed, take a breath and walk your feet out as far as possible stretching through your torso and legs.

Coming back up (pic. 7&8 )

Walk back in to the point at which you landed when you dropped.

You want to bring as much weight forward as possible

Drop the shoulder blades down your back, inhaling push your chest out and down towards the mat, arch the back as much as possible.

When your ready exhale, hold the exhalation and hop up

It's the hips that will carry you over, bend your knees and when you hop up think about lifting your hips rather than your feet and legs.

As you hop up push your hips up and forward over your shoulders and your chest down towards the mat.

You want to catch the point just before you were forced to drop, you don't have to hop all the way up just to that point and catch the point of balance.

Once caught, draw your legs closer to your body and careful release the arching of the back raising the hips, the knees and finally the feet


Tuesday, 20 December 2011

Day 80 : INVERTED : Urdhava Padmasana (inverted lotus) from Vinyasa Krama Inverted sequence

VIDEO LINK
HINTS/TIPS/SUGGESTIONS

Padmasana (lotus) can be a challenging posture and there are many places to work towards it in Vinyasa Krama.

In Asymmetric Sequence: Padmasana doesn't appear as such but there are several hip opening postures, janusirsasana in particular, that prepare you for ardha baddha padmasana (half lotus).

In Lotus sequence : The lotus sequence picks up where Asymmetric leaves off with more vinyasas in half lotus before moving on to full lotus.

In Seated sequence : Padmasana (lotus) follows the deep hip opening subroutines of upavishta konasana and badha konasana.

In Supine sequence : More half lotus variations, this time in dwipadapitam (table pose). In shoulder stand we have the half lotus vinyasas of Day 68 but also the extreme hip openers of the previous (Day 69 ) Urdhva Konasana subroutine.

In Inverted Sequnece : As with Supine and Seated the lotus vinyasas in headstand follow, konasana and badha konasana subroutine.

In all of the above sequences we can see that padmasana (lotus) follows hip opening postures, this is because padmasana (lotus) is a hip rotation rather than a twisting of the knees.

CAUTION
Don't twist the knees to get into padmasana, rather the knee is relaxed slightly and the femur head rotated in the hip joint allowing the knee to come out to the side like turning the page of a book bringing the foot up toward the opposite thigh. We bring the foot to the opposite groin by rotating the hip joint further to bring the foot into place.

Once one foot is comfortable on the opposing thigh we do the same for the other leg, relaxing the knee slightly, rotating the femur head in the hip joint but here in the inverted postures of shoulder stand and headstand we can allow the first leg to drop back a little to allow the second foot to come up smoothly on to the thigh, working the foot deeper into the groin.

Allowing the first leg to drop back to allow the second foot to come up onto the thigh more easily is something that's only available in the inverted postures. For this reason Supine and inverted may, surprisingly, be an easier option for developing padmasana.

In Sirsasana

Come into lotus via urdhva konasana. Spread the legs wide, on the exhalation, bend the right knee and rotating the femur in the hip joint bring the right foot up on to the left thigh (you may drop the left leg back a little to counter the weight of the knee coming forward to stay balanced pic.3). Inhale and on the next exhalation take your right knee back which will cause your left knee to bend slightly. Rotate the left femur head in the hip joint to bring the left foot onto that right thigh. 

You may need to shuffle your feet slightly to settle into your lotus, try to do this by working from the hip joint rather than from the knee.

Twists
twist on the exhalation, a gentle twist at first, twisting a little further on each exhalation.

Anchor the head and elbows

Press the opposite elbow to the direction your twisting firmly into the mat.

Viparita yoga mudra - Lowering your lotus

These become progressively more challenging.

Version 1 (pic.7) bend at the waist while exhaling bringing the knees to the chest . 

To raise your lotus, engage your bandhas and lift on the inhalation.

Version 2 (pic.9), bend at the waist on the exhalation, to the previous position, but then, while continuing your exhalation, round the back slightly to bring your feet to your chin.

To raise from there, engage the bandhas and while inhaling, straighten the back and then the waist.

Press into your elbows as you lift.

Version 3  (pic.11) on the exhalation, bend at the waist then round the back to bring your feet to your chin ( the previous position). Your knees should be almost tucked into your armpits and resting at the top of your arms.

Take an inhalation here and then on the next exhalation slide/lower your knees down the backs of your arms to rest on the mat touching your elbows.

To lift back up from here, exhale fully, engage the badhas and pressing firmly into the mat with your elbows draw your knees back up the back of your arms to your armpits.

Take a breath and on the next exhalation, straighten the back to bring the knees to the chest and then straighten the waist to bring your lotus the last of the way up.

Lifting the lotus is challenging, once lifted, pause to take one of two breaths, then when you are ready, allow your knees to draw apart, releasing your lotus back into urdhava konasana, finally bringing your legs back together into sirsasana sthiti.

Lotus to Sirsasana VIDEO LINK

The final vinyasa called for a tight lotus and you may wish to work towards this as a separate subroutine (see Lotus subroutines -to come).

From seated padmasana, lift up onto your knees, bend forward and place your hands on the mat with the fingers interlocked ready for headstand. Place the back of your head in the cup formed by your hands and bring your knees forward so they are touching your elbows.

To lift back up from here, exhale fully, engage the badhas and pressing firmly into the mat with your elbows draw your knees back up the back of your arms to your armpits.

Take a breath and on the next exhalation, straighten the back to bring the knees to the chest and then straighten the waist to bring your lotus the last of the way up.

Follow the directions above for the 3rd version (pic 11) to lower and raise your lotus to and from the mat. 

Monday, 19 December 2011

Full Vinyasa

Practiced Full Vinyasa yesterday

'Full vinyasa is the original form of Ashtanga taught by Sri Krishna Pattabhi Jois, after each asana you transition back to Standing as if doing a sun salutation. In postures where you switch legs, the Janu's and Marichi's for example, you practice half vinyasa between legs employing the more usual jump back and jump through, then after completing both sides you transition back to standing.'

Really nice practice, felt light and airy somehow, perhaps all that coming up to standing and getting a breath of fresher air.

It takes a little longer though, Lino's DVD, where he practices full vinyasa, runs to 1:47 my practice yesterday was 1:35


I've been practicing my Ashtanga in the evening since the colder weather's come on and tend to crank a Primary out in just over an hour, Sharath pace, little faster than I used to practice it in the mornings but than I'm trying get some heat going.

Full Vinyasa helps with the heat but if I want to practice it every evening I'll have to jump on the mat as soon as I get through the door.

Didn't find it any more strenuous than regular Primary, if anything it felt a little easier, lighter, nice balance to it starting each posture from standing, from scratch if you like and of course ties in with Krishnamacharya's Yoga Makaranda nicely (which you can download for free over on the left).

I used to practice full vinyasa a while back , just checked and it was Sept 2009 (that's the post where the quote above is from) can't see when and why I stopped. I think Kino's 2nd Series DVD came out and I probably started trying to tidy up my second

I was quite intense last time around, trying to get to grips with the tradition and how this style was originally practiced etc etc. Less earnest now perhaps, just felt like practicing Full vinyasa and besides Michelle has been FBing on how much she's enjoying it, felt left out.

Not a bad idea if I'm going to do that close reading of Yoga Mala in the new year.


Anyone know if Lino's 2nd and 3rd series DVD, the one with Gwendolyn Hunt is Full Vinyasa? I'm assuming it is.... and what's this about Lino bringing out a new book that covers Advanced series, anyone heard anything?


UPDATE
Yes, both 2nd and 3rd are FULL Vinyasa on the video, finally managed to pick up a copy a few years later.

Day 79 : INVERTED : Upavishta konasana ( inverted triangle) subroutine from Vinyasa Krama Inverted sequence

VIDEO LINK

See  Day 77 for general headstand practice guidelines.

HINTS/TIPS/SUGGESTIONS

We stay in urdhava konasana for six long inhalations and exhalations allowing us plenty of time to deepen the posture.

Spread the legs wide and allow gravity to widen them further for the first couple of breaths

Rotate the thighs outward and allow the legs to widen a little further with gravity.

Try tensing the muscles of the thighs for one or two long breath and relaxing them for the next allowing them to widen still further with gravity

Twists (pictures 3&4)

Stretch out through the length of both legs

Twist on the exhalation

Press the opposite elbow from the direction your twisting firmly into the mat to maintain balance and stability.

Urdhva badha konasana

We stay in bahda konasana for six long inhalations and exhalations also, allowing time to deepen the posture.

Bend the knees and bring the feet together for the first couple of breaths.

Fot the final breaths press the heels together and on the exhalation, working from the hips , open the knees laterally like opening a book.

Relax on the inhalation, maintaining the stretch  but press into the heels once more on the exhalation while rotating the femur head in the hip joint further and allowing the knees to open wider.

Day 78 : INVERTED : Leg raises subroutine from Vinyasa Krama Inverted sequence

VIDEO LINK
See Day 77 for general Sirsasana (headstand) practice guidelines and Day 76 for Sirsasana lead in and How to do a headstand.

HINTS/TIPS/SUGGESTIONS.

Urdhava akinchasana (Day 77) is ideal preparation for this subroutine.

As with akunchasana use the fill length of the forearms to control your balance, especially the elbows.

Engage the bandhas especially, uddiyana (drawing in the belly) for lowering of the leg to the front.

Lower from the hip rather than from the foot

Stretch out through the length of the leg as you lower.

Stretch through the leg that remains vertical

Ideally the vertical leg should not come forward while the other leg is lowering, nor should the knee bend.

When lowering the leg to the side press down through the elbow on the opposite side to stay balanced

In viparita garandasana, begin to wrap the leg as low as possible,

Once wrapped stretch up though the leg that is being wrapped, try to stay straight and not lean backwards.

In the back arch, twist first and then arch the back.

Anchor the head and elbows as you twist

Press down firmly into the mat, the elbow on the opposite side to which your twisting.

Engage mula and uddiyana bandha to help support the arch of the back, engage the hips and push them forward.


Sunday, 18 December 2011

Day 77 : INVERTED : Akunchasana (knee bends) from Vinyasa Krama Inverted sequence

VIDEO LINK
'...when sirsasana is mastered, the breath rate, which is normally about fifteen to twenty breaths per minute, automatically comes down', 

Work towards two breaths a minute over time.

'Sirsasana should always be practiced in the morning, as is laid down by the authorities on yoga.' 

'And, as a counterpose, it should be followed by an equal length of time in the practice of sarvangasana (shoulder stand)'. 

'The procedure is thus to do  sirsasanam for twenty-four breaths, followed by a two-minute rest in savasana. Then one should do sarvangasana for the equal number of twenty four breaths, followed by a sitting posture each as padmasana for a few breaths, until one feels normal and relaxed'.  

from Srivatsa Ramaswami Yoga for the Three Stages of Life p142

HINTS/TIPS/SUGGESTIONS

Towards the end of my morning asana practice I spend few minutes in the sarvangasana preparatory postures, anapanasana, urdhva prasarita pada hastasana and dwipadapitam.

I then spend at least five minutes in sarvangasana, the first three minutes with the legs relaxed.

Then I practice for headstands for ten to twenty minutes (ten minutes minimum).

For the first five minutes I don't practice any vinyasas but try to slow my breathing towards two breaths a minute and work on engaging bandhas.

The rest of the time in headstands I spend on Vinyasas, one or more of the inverted subroutines.

Coming down from headstand I'll stay for a fem moments with my forehead on the mat, when sitting up I'll bring my head up last.

After a couple of minutes in savasana I practice another five minutes of Sarvangasana (shoulder stand), this time practising vinyasas, one or more shoulder stand subroutines

Finally I'll spend a period of time in Vajrasana, padmasana or mahamudra before moving on to my pranayama practice.

the head point of sirsasana should be the crown of the head

Control your balance with your forearms and especially your elbows

Urdhva akunchasana

For these movements the neck and shoulders need to be relaxed and well stretched out, the hasta vinyasas in tadasana (Day 1) are a good place to start your practice.

Bend the knee towards the chest on the exhalation, straighten the leg on the inhalation.

The danger is to fall forward out of the headstand while bending the knee towards the chest, be sure to engage the opposite hip and stretch out through the full length of the leg.

The tendency is to lean the straight leg forward, imagine taking it backwards slightly to counter the pull forwards.

Don't try to bring the knee down too far on the first bend, work a  little deeper on each repetition.

If necessary take an extra breath or two after each bend of the knee, adjusting the head arms and shoulders.

round your back slightly on the third bend to bring the knee lower.

Engage bandhas, uddiyana bandha, sucking in the belly will create more space allowing your to take the knee lower.

Bringing both legs to the cheat is more challenging as you don't have the trailing straight leg to act as a counterweight, round the back, again, go a little lower on each exhalation.

In Ardha-padmasana-akunchasana try to bring the leg as far into the goring as possible, shuffle the foot in a little deeper if possible.

In Ardha-padmasana-akunchasana the need to round the back slightly will be more apparent.

Saturday, 17 December 2011

Day 76 : INVERTED : Sirsasana (headstand) lead in from Vinyasa Krama Inverted sequence

VIDEO LINK
Ramaswami writes concerning Sirsasana (headstand) and it's subroutines

'...inversions should be considered as unique contributions of Yoga, for health. Within the first few minutes of Sirsasana practice, the leg and thigh muscles, the gluteal muscles, relax. The chest, back, shoulders and neck muscles also relax as all these are not required to maintain the postural tone as in the upright position. It has been found that due to the relaxation of the leg muscles, the blood pressure in the legs drop to about 30mm.There is no great rush of blood to the head among the adept yogis due to auto regulation; yet the gravity helps to open up many capillaries in the brain, head and face which may otherwise remain partially closed. People with high blood pressure and retinal problems will have to be careful. However persons with mild hypertension and under control with diet, life style change and even medication could benefit from this posture if they had learnt it from early life. It appears to increase pressure on the shoulders which would result in the brain trying to reduce the blood pressure. Therefore if one would practice Sirshasana regularly for a sufficient duration, one’s pulse rate tends to reduce, thereby reducing the strain on the heart. Gradually there is a reduction in the blood pressure'. 

There are several approaches to headstand, the above is the standard Vinyasa Krama approach.

If your new to headstands here is a link to a tutorial http://youtu.be/J68JvZtAHN4

HINTS/TIPS/SUGGESTIONS

Consider using a wall while building confidence ( this us useful when kicking up into headstand as you can tap off the wall - see tutorial link above)

When interlacing the fingers, engage the little fingers (pic 2)

Make a firm base with your arms, your going to press down through your arms and take most, if not all,  of the weight on them rather than on your head.

Headstand is an arm balance

Walk in bringing the hips over the shoulders and even beyond them  to use as a counterweight for your legs. (pic 5)

Engage moola and uddiyana bandha, 

Raise the feet off the mat while exhaling and bring the legs close to the body (Pic 6)

Press down through the length of your forearms, especially your elbows as you raise your feet. 

Focus on the hips or the pelvis in space.

Drop the shoulder blades down the back, this should create space stop your neck getting pinched

Stretch out through the whole length of your body, engage your legs and bring your attention to the 
furthest point, your toes

Focusing the mind on the toes will control the balance when fully extended.

Come down by going back to half headstand, bring the legs to the chest

Make sure the toes are turned up so you land safely.

Thursday, 15 December 2011

DAY 75 : Supine: Subroutine Breakdown


VIDEO LINK


Ramaswami recommends we spend five minutes in Sarvangasana (first three minutes with the legs relaxed next two with the legs straight in standard Shoulderstand) before practising the sarvangasana vinyasas

Ramaswami would also recommend a counterpose after sarvangasana so as to relieve the strain placed on the neck and shoulders, he suggests bhujangasana (cobra, Day 45) and especially makrasana (crocodile, Day 44) as ideal counterposes, stating that, 'The counterposes, as a rule, should be simple, effective and targeted' (Yoga beneath the surface p105).

Supine used to be my least favourite sequence when I first started practicing Vinyasa Krama. It's long a  sequence  and I was never sure what approach to take. It took quite some time to realise it was, if anything, the perfect sequence, forward bends, twists, backbends, inversions, leg behind head postures, lotus... it has everything.

That said, because of it's length I don't tend to practice it as a stand-alone sequence, I do however practice most of it's sequences regularly.

I practice takamudra as preparation for deep forward bends like pashimottanasana as well as a counterpose for backbends, pressing the lower back into the mat while engaging bandhas.

I practice Apanasana, the pelvic floor poses for the same reasons.

In advanced back bending I've realised the importance of pushing the hips forward as far as possible and tucking under the tailbone, Dwipadapitam (desk pose) is perfect for working on this and ideal preparation for urdhva dhanurasana and Charasana (wheel pose).

It has some of the best twisting postures in yoga with Jataraparivritti (belly twists).

It also has some of the best leg behind head preparation I've come across.

As well as an excellent preparatory subroutine for Shoulder stand.

Day 74 : Karnapindasana ( closed ear pose) subroutine from Vinyasa Krama Supine sequence

VIDEO LINK
As a reminder, Ramaswami recommends we spend five minutes in Sarvangasana (first three minutes with the legs relaxed next two with the legs straight in standard Shoulderstand) before practising the sarvangasana vinyasas

Ramaswami would also recommend a counterpose after sarvangasana so as to relieve the strain placed on the neck and shoulders, he suggests bhujangasana (cobra, Day 45) and especially makrasana (crocodile, Day 44) as ideal counterposes, stating that, 'The counterposes, as a rule, should be simple, effective and targeted' (Yoga beneath the surface p105).

HINTS/TIPS/SUGGESTIONS

To be able to bring the knees to the mat beside your ears, the neck and shoulders need to be sufficiently relaxed. A long sarvangasana or  some halasana subroutine variations can help achieve this,

Engage jalandhara bandha, the chin lock, bringing the chin tight against the chest.

Engage uddiyana bandha, drawing the belly in and up to creat more space for the forward fold.

Kandapindasana is a posture in which we can stay for a considerable amount of time, Ramaswami recommends twelve breaths.

Because of the tight fold, the inhalation will be short but try to lengthen the exhalation.

To bring your legs through the arms, retain uddiyana and on the inhalation, stretching each vertebra, allow your back to slowly unfurl along the mat, keeping your legs as close to your body as possible all the way through the arms.

Ideally the legs should not touch the arms on the way through.

Wednesday, 14 December 2011

Mandala

from HERE
Not sure how I feel about acroyoga, besides usually the guy gets stuck on the bottom while tiny light girl gets to do all the fun stuff.

M: "You want me to do what?????"

I posted on the Sarvangasana mandala from Vinyasa Krama yesterday, a lousy video from me, not much space so don't practice it much, perhaps it's enough to give the idea. I need to do another one though with Ramaswami's breath recommendations. Should probably redo the head and handstand versions while I'm at it, make the most of the extra space in the home shala

While getting the link from my video this showed up in the Youtube side bar


...in this one big muscly guy gets to do the fun stuff for a change.

And then there's this acroyoga video doing the rounds of FB


But, in case, like me,  you too are a little ...unsure of acroyoga...


....it has pedigree.
--------------------------------------------------------------------
All asana'd out from yesterday so taking a rare and belated moon day. Long backbend practice, a mixture of Heather Morton's backbend DVD (nice review from Maya HERE), her sun salutation with the backbend focus, Vinyasa Krama Bow sequences leading into 2nd series Ashtanga.

Managed to complete four Vinyasa Krama Practice Book posts yesterday to catch up, even get ahead, including the Supine subroutine breakdown sheet (for tomorrow)

Finally Supine is finished, long long sequence, around twenty subroutines. SeemsYoutube are now allowing me to post video's over an hour so I was able to re edit and post the complete Supine sequence and at regular speed, starting to consider a voice over.


From Thursday it's the Inverted subroutines (headstands) then just the Lotus subroutines to go and it's done, can disappear to the metaphorical cave for a while.

No asana this morning but perhaps there's time for some pranayama and a short sit before work.